This topic contains 65 replies, has 10 voices, and was last updated by ![]() BHudson 3 months, 1 week ago.
BHudson 3 months, 1 week ago.
-
AuthorPosts
-
12/02/2016 at 1:24 am #26841
@microcan The points you raise are valid, and indeed the examples that you detailed demonstrate that the current FFF tech might not be able to achieve a truly perfect result of this model in normal conditions. After thinking about it a bit, @click’s comment saying that this is more of a test meant to push printers to the limit and show objectively how capable they are in these extreme situations (or how gracefully they fail) makes a lot of sense.
That being said, I have great news regarding the tests with Filaflex combined with ABS. @bhudson, as you did, I also experienced problems getting the filament caught by the extruder so what I ended doing is basically disassembling the extruder and inserting the filament manually to the new black piece between the gears.
I had to do this because at one point while trying to push the filament in, it did get caught by the gears but I was unable to advance it any further and couldn’t eject it via Automaker either, so the only way to get the filament dislodged was to disassemble the extruder, which showed that the tip of the material was failing to enter the above mentioned black part.
It was a bit difficult but I managed to close the assembly with the material in it’s proper channel inside it. After that everything worked nicely. I used a Filaflex profile that @pete shared some time ago with no problem, even though I did change the speed to 60% rather than 40% and saw no noticeable impact in quality.
The part with the seal included printed very nicely and worked perfectly for the application I’m going to use it for (a dampened rotating joint). I’m currently at work but I’ll try to post some photos later tonight. In the mean time you can see the joint STL files I created to see the test I did in more detail. Files 2 and 3 had to be loaded together for them to be positioned correctly by Automaker.
Really excited by these results and the possibilities they entail!
-
This reply was modified 7 months ago by
 Luis Bustamante.
Attachments:
You must be logged in to view attached files.12/02/2016 at 8:21 am #2684613/02/2016 at 8:25 am #26859@microcan I am pretty sure it doesn’t at the moment. But you can always grab gcode from the project’s dir and thread it thorough something like http://gcode.ws/
In this case it is even simpler. I would expect slicer to do what it did for the window frame - find shortest route between two solid points. But internally they are quite complex beasts on their own so who know what is going on there…
17/02/2016 at 9:26 am #26946Speaking of bridges - 3D printers can defy gravity to the certain point. This image draw my attention:
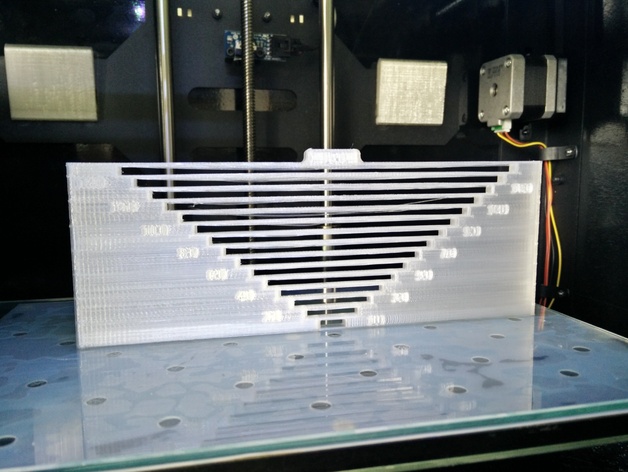
(from here http://www.thingiverse.com/thing:799487)
So - those really tiny spans in 3DBenchy shouldn’t be a problem at all.
17/02/2016 at 9:56 am #26947Nice test to see how far you can go.
17/02/2016 at 11:26 pm #26957@luis-bustamante has the link for where the dual head instruction video is worked for you as i just get a blank page so haven’t been able to watch it yet. @pete any idea when the proper page will work as haven’t been able to use mine yet..
17/02/2016 at 11:31 pm #26958@streatsi Here’s the direct link to the videos in youtube: https://m.youtube.com/watch?v=xuZc1DN_a5k
18/02/2016 at 10:47 pm #26994@luis-bustamante ah sorry i meant the video they say for watching before use rather than the install. mine has been pre installed..
19/02/2016 at 1:54 am #26996@streatsi I haven’t seen that video. If you get ahold of it please share it here if you can.
02/03/2016 at 3:31 pm #27343In the mean time, does anyone have some dual material prints to show off?
I’m still awaiting my DM head, as I am in the second batch. But any pictures of dual color or dual material prints would be appreciated!
Luis, how are things coming along on your side?
Regards,
Bert
02/03/2016 at 3:34 pm #27344Updated the models in the USB drive, there are some Dual Material specific models in there now
02/03/2016 at 5:31 pm #27353@brjhaverkamp sorry for my silence, I’ve been away from my printer travelling for my work. I’ll resume testing as soon as I get back.
Thanks for the new models @pete, I’ll give them a try.
-
This reply was modified 7 months ago by
-
AuthorPosts

You must be logged in to reply to this topic.