
This topic contains 71 replies, has 14 voices, and was last updated by ![]() 3peakslite 1 week, 6 days ago.
3peakslite 1 week, 6 days ago.
-
AuthorPosts
-
16/10/2014 at 4:14 pm #8025
Since my head is in service at the moment I found some time to photograph some of the items I haven’t showed already printed with the Robox;
I’m mostly into functional prints as you can see and I use some of them on a daily base already. They are here to show what I’ve printed, how I got the best results and what failed and why.Manfrotto tripod base plate for mobile phones
This is one of my own designs created in OpenSCAD, it’s a replacement Manfrotto mounting plate for my tripod but instead of a screw you can put your phone in it. This one is made for my Xperia Z3. I printed it as 2 ‘slide together’ parts with some supports generated by Automaker for the part where the phone is connected. Unfortunately it’s a bit too tight for my phone due to shrinkage (even with this PLA it occurs) so take some room into account to make sure it fits. For the base plate I didn’t use supports, it worked bridging the gap but it dropped a bit since it wasn’t supported leaving path-blocking filament lines on the print. I removed them with the tools and that worked out. Supports are hard to remove so the phone part isn’t that nice on the underside but who looks there anyway?

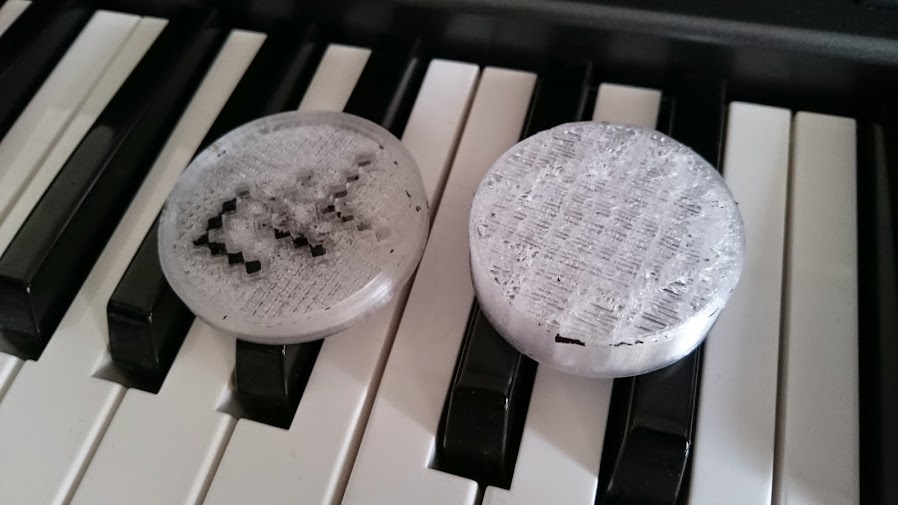
Replacement clips for a box
My girlfriend lost a clip of a cupcake box (yes, they exist) a while back and it was a good practice for me to make a replacement. I used OpenSCAD for this as well and had the STL ready since last year so now I was finally able to print them; They are a perfect fit for the box and blend in nicely due to the transparent filament. It did have a lot of blobbing on the inside but that’s due to the problem with my printhead so it’s not on the photo.
Cat food toy
I’ve got 2 cats (They are called Mario & Luigi of course, Mario loves printers, I scare him away every time he tries to come anywhere near the Robox) and they both love threats, but they eat them so fast it can’t be good for em; So I printed this; It printed nicely and it really works, fun to watch

Garden gate key
I’ve got a garden gate with a lock on it; you know the one, with the old-fashioned keys. One thing that bothered me was that the key takes up so much space on my keyring and is way too big for what is needed; So a nice project for the Robox. Printed this one so many times and a lot of them failed, they either tipped over (standing upright), had too much support making it impossible to remove it or it wasn’t strong enough; If you want to print these kind of keys I would recommend printing it laying down, with brim and supports at a 100% fill; That’s what I did with this one and this one is strong enough to work in my lock without breaking and messing things up. I’ve added the original key to the photo to see the improvement. Bonus for the green color since it’s a keychain as well now
Photo background setup
Sometimes you want to make a photo with a white background; You can use one of them mini studio’s but they take up space and you need to set them up and break them down again every time because cats like those tents as well and white fabric doesn’t mix well with hair from cats, so using a single sheet of paper can be a nice alternative, this print makes sure the paper is bended in a way you won’t see it’s bended so it makes for a good background.
Cookie cutters
Everyone loves cookies right? I sure do and especially if they are fresh and warm. My girlfriend designed these cookie cutters in Illustrator and I created the 3D models for them. It was quite challenging to find the right settings to print this without huge blobs in the walls or gaps but these settings worked out nicely: 0% fill, 0.2 layer height, 7 first layers solid, 3 top layers solid, 2 perimeters 0.25 mm, the walls of the cutter are 0.6mm, there is no gap between the perimeters and using 0.30 mm causes artefacts in Slic3r. The _XT material is quite nice for cookie cutters since it’s food safe as well.
Failed print: Puzzle
It looks OK in this photo but actually it failed; the print tipped over just before it being finished rendering it unusable. Tip: Always add a 3 perimeter brim if your not sure it will stay upright. It had a lot of blobbing in the inside as well (looks like Slic3r again) but I could scrape most of it away with the tools. Design is on thingiverse.
Failed finish: Stamp
A 3D printed stamp with my company’s logo using Sugru, how much cooler can you get it? The print worked out fine (it’s a mould and a handle for the stamp) but unfortunately the Sugru got stuck in the grooves (the black parts you see) breaking my stamp after curing for 24 hours. It’s a pain to clean out but once I’m done with that I’ll try again.
Phone stand
This was a simple print, just adjust the parameters in OpenSCAD to your phone’s dimensions and print it without supports. Doesn’t take a lot of filament and is a perfect fit. Unfortunately there is some warping, possibly due to my lack of patience after the print finished
Design can be found on youmagine.Tea-bag/filter holder
I like tea, but I don’t like those damn bags, too wet to throw in my desk-bin but I have to leave them somewhere. This is a solution for that and it just works. There’s some blobbing on the edges, not sure why, but it fits great and does it’s job. Design on youmagine.
Flight controller casing
Came out a little messy but it fits nicely; It’s a housing for a flight controller (the popular KK2 board) for multi-copters. This is just a bare PCB with a small screen attached to it; This housing makes it a bit more friendly. Design is on thingiverse.
Daft punk helmet
Just a small test for some PLA from Colorfabb, got this design of Thingiverse. It got some great details but unfortunately a big part of the model looks like crap due to the printing on still liquid layers, hopefully this will get resolved soon
Lightblue Bean housing
A lightblue bean is a cool little Bluetooth LTE device based on the Arduino capable of being a iBeacon. In it’s bare for it’s just a PCB as you can see but it look pretty nice if you put it in this 3d printed housing from thingiverse (really like it with the transparent filament) . The back plate is a very tight fit and I needed to scrape of a lot of it but it was worth it and now it looks and feels like it should.
Xperia Z3 magnetic charging dock
I just got this phone and it’s great, but connecting that micro USB cable is annoying and it has a option to charge with a magnetic connector as well, but the dock isn’t available yet (or wasn’t at the time) and is 45 euro’s for a piece of plastic with a cable in it, so why not make it myself? Using illustrator for the shape and OpenSCAD for the 3d part of the design I designed and printed the dock, I had to print a fitting part for the cable later on since I didn’t have the cable yet but with some cutting and trying it worked out fine. I use this every day now to store and charge my phone and it only cost me some filament and a 5 euro cable.
Looking forward to see some more of your prints guys, so many roboxes out there and so few results on the forum just yet
Hopefully I will be printing again very soon- This topic was modified 2 months, 3 weeks ago by dave. Reason: Messed up formatting for tags
16/10/2014 at 4:46 pm #8027Oops, posted it in the wrong sub-forum, sorry :X
Here another one:
Headphone holders
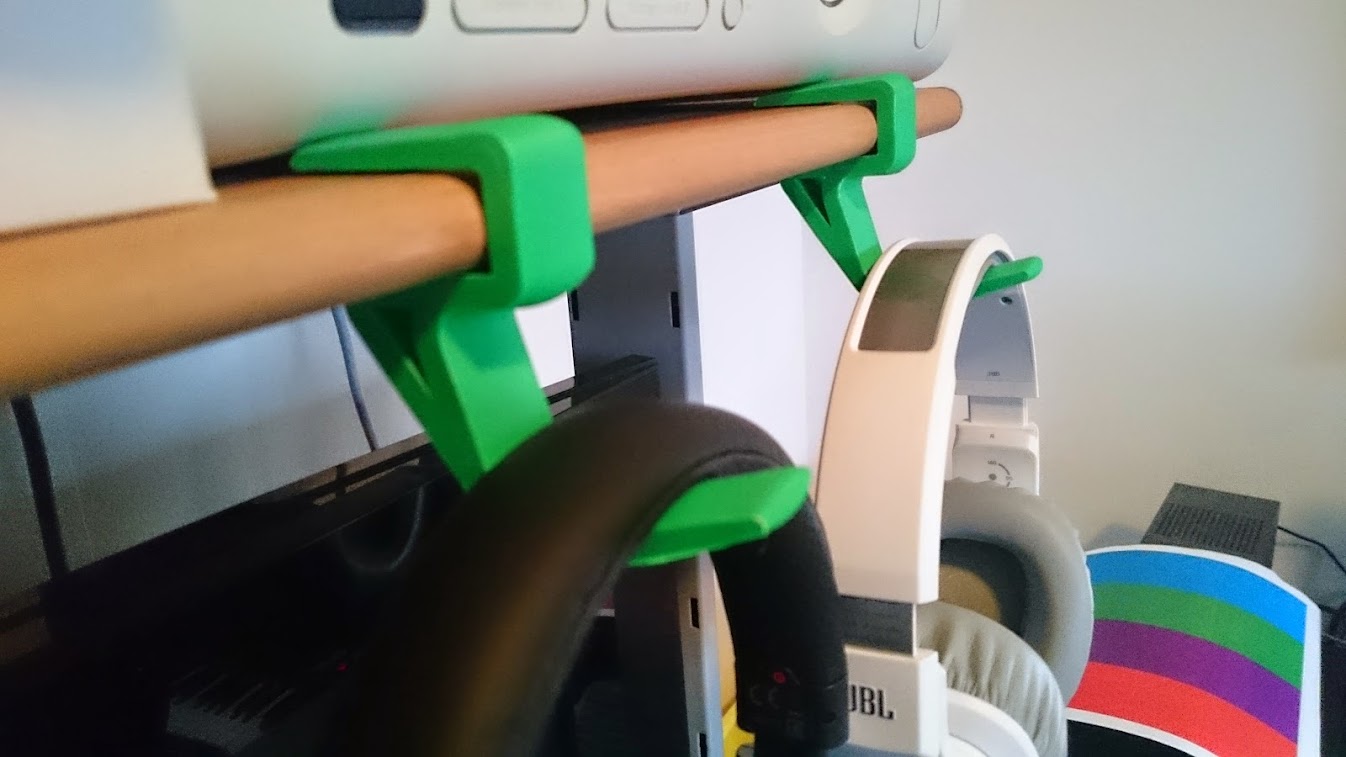
I always have multiple headphones everywhere on my desk; tangling cords, always taking up space. No more with these nice headphone hooks. Attached to a desk you can hang ‘em on there making space on your desk for more important matters like 3D printing waste!
16/10/2014 at 4:59 pm #8028@ dave some nice prints there, you have been busy.. good to see some useable stuff being made. I have also used mine for prototyping a load of work stuff which has helped on the design development process as well as fixing stuff around the house but no pics to hand. will have to sort some pics out
16/10/2014 at 6:02 pm #8029WOOOOOOOWWWWWWWWWWWW!
Thank you @dave
This is excellent stuff. I appreciate your focus on functionality, and the hi res pics you have posted here. Love the quality of the kitty treat holder, the mini studio feet, cookie cutters and charging dock. The teabag drainer is a very cool idea, and I could definitely do with one.
This might be especially reassuring for CEL. If they properly test each new unit before shipping, and the new owners give the operating manual, @gid ‘s website and this forum a thorough read before starting, they could get the time (& space) to deal with the issues from the backers and begin to focus more on improvements.
I think it is the community’s duty to post pics of the good prints too.
A morale boost is in order!
16/10/2014 at 9:12 pm #8034Thanks for the enthusiastic responses so far, I really enjoy using my Robox and it sure is useable, there are things that can be done better but if you find your way around working with the settings and knowing your materials it gets better all the time
I’m fortunate enough to run my own business from home so I can just leave the Robox printing all day keeping an eye on it trough a webcam and running to it when something looks wrong so I had a lot of print time available (up until I had to send the head in I printed every day since it arrived). The ‘hi-res’ pics are just some photo’s taken with my phone, it’s great for fast photo’s that upload to Google+ or dropbox automatically and the quality of phone camera’s has drastically improved over the years, I preferred my iPhone 5 camera over my Sony DSLR with expensive lenses for easy snapshots but with this Z3 you can take the quality even further almost matching the DSLR for most generic shots while it fits in my pocket, gonna love tech I agree, if everyone just posts some of the more awesome prints created by the Robox the more sceptic users might use it again; I already like what I can do with it and it will/should only get better from now on by software improvements and getting more skilled by printing even more
Hopefully the PLA issue will be resolved soon so I can print more in the White PLA, it would be nice if the filament shipment comes through anytime soon so I’ll be able to order and print more using the original Robox filament 17/10/2014 at 7:16 am #8036dave, seems you have build up some practical knowledge about using robox.
You see a way of sharing a bit of that in the form of some “light reading” ?java (EE), JavaFX, HTML, GIS) programmer, database wizard, framework inventor, looking for a job ! http://roboxing.com/wizards17/10/2014 at 7:25 am #8037@dave : these are fantastic… Nice job! Any advice, settings or even just showing off, please do consider writing up on Roboxing.com
I like the Sugru mold. One of the first functional parts I made was a two part mold for an iPad Dock Connector plug that was fraying. Squoze in some white Sugru and it worked nicely!
Tom Gidden -- Bristol, UK -- New Roboxer? Check out the wiki, and add yourself to the map! http://roboxing.com/user_locations17/10/2014 at 7:59 am #8040Great prints there @dave. Nice to see someone creating their own parts for an actual use!!! Keep up the good work.
17/10/2014 at 8:27 am #8045Ah The stamp was really cool! I have plans to make one too, but it’s combining a laser cutter with the printer. i.e. use the laser to cut foam for the stamp and the printer to make the handle/case. It’s on my busy to do list anyway.
17/10/2014 at 9:13 am #8050Nice Dave!
18/10/2014 at 9:00 am #8079
AnonymousNice prints. When it’s working I find the Robox very addictive, I’m always thinking about what to print next and how to tune it or fix tricky prints. Really hope to get mine going again soon.
28/10/2014 at 10:28 pm #8577Jay, got my head back today so I can print again! @chrisyt asked me to post some more awesome prints so here goes.
I really missed my daily printing sessions so I did some shopping while waiting.
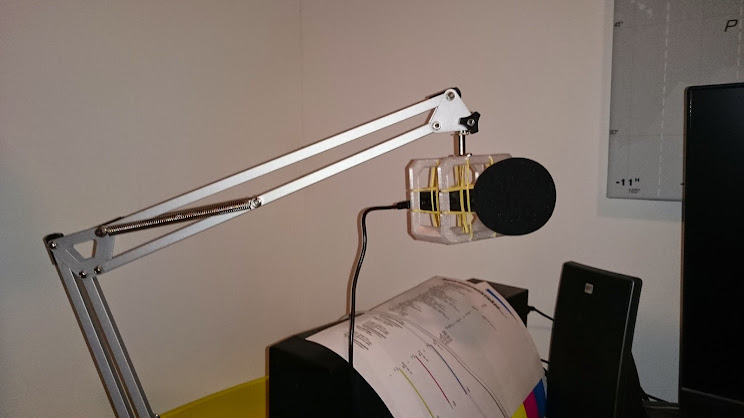
Inspired by this thing right here on thingiverse I went to the ikea to get a TERTIAL lamp (only € 9) for a Microphone mount.
I cut the cord, removed the lamp part, designed a part fitting my Zoom H1 recorder since the one on Thingiverse is too small for my mic and waited until my head arrived.
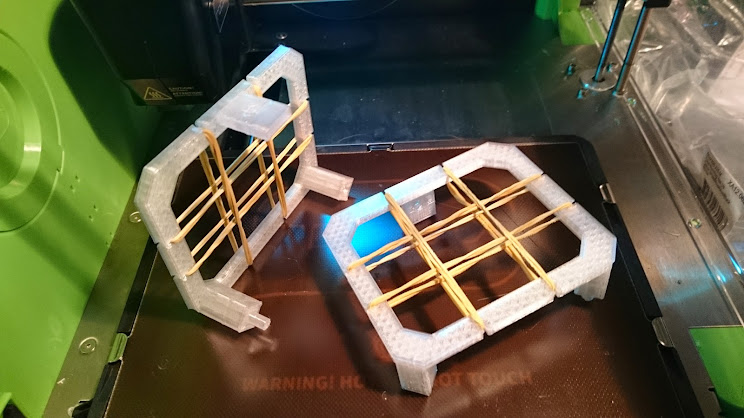
Took me 2 hours to print (+ another 2 hours due to a failed print, the white PLA issue clearly isn’t fixed yet :P), snapped the 2 parts together with some rubber bands attached, screwed it to the arm and now I have a nice and cheap studio arm, custom made for my microphone. It works great and you can adjust it to all kinds of shapes, Skype will never be the same
Hopefully more good prints soon!
-
AuthorPosts
You must be logged in to reply to this topic.